


In this blog I will write about how did I used openID to connect jenkins to AWS using keyclock or using OIDCProvider plugin in jenkins.
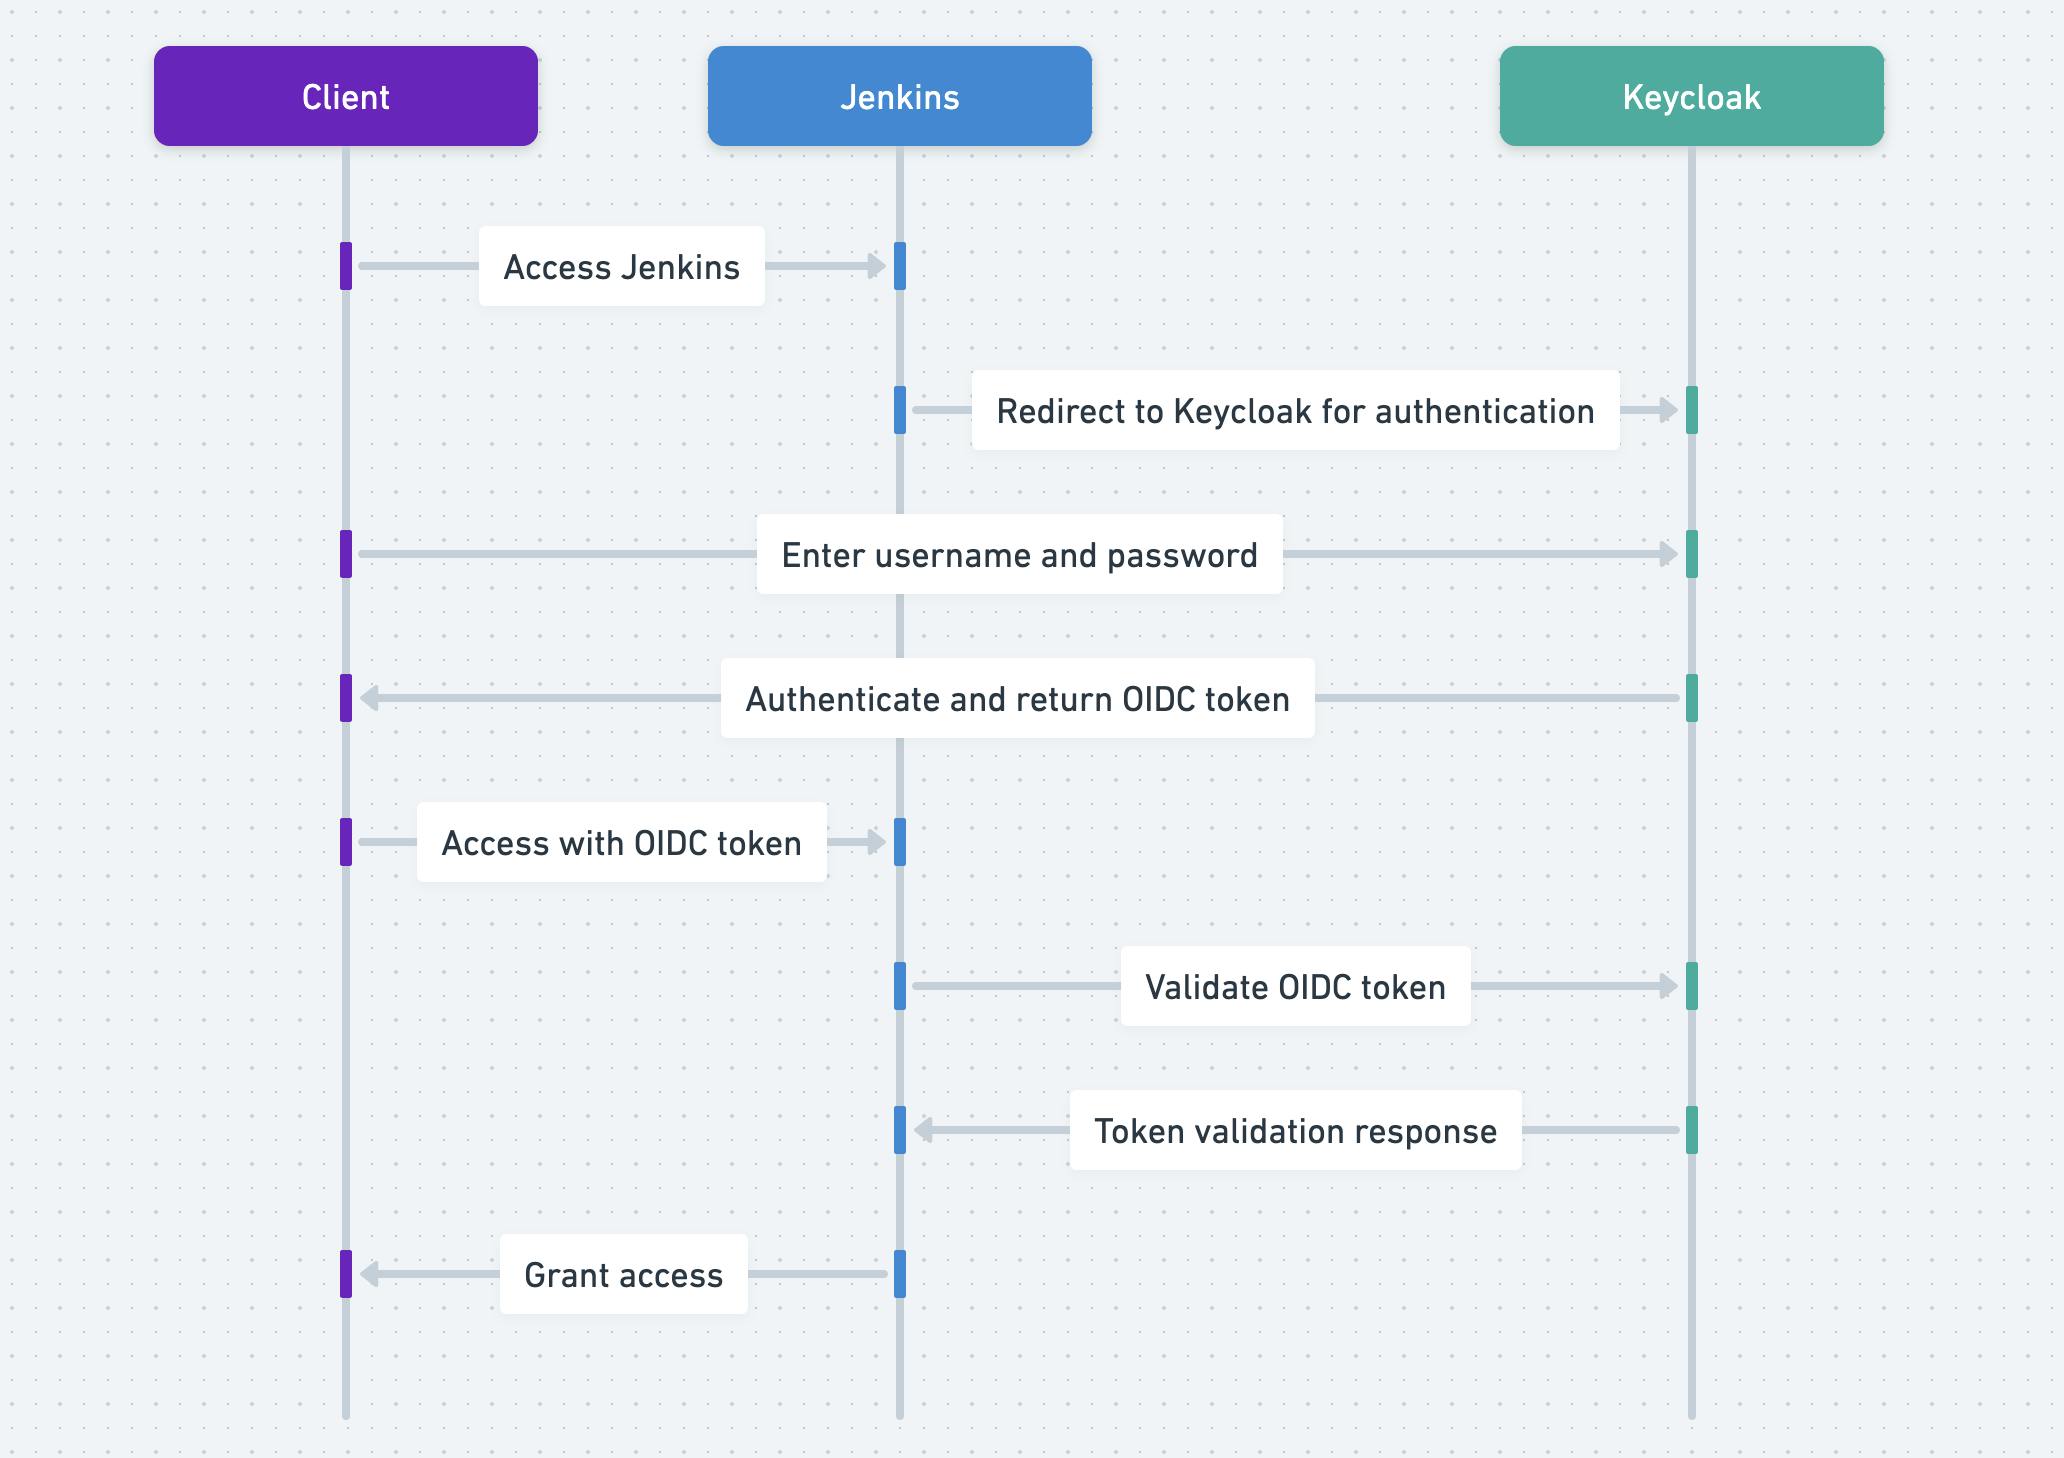
the following diagram will explains how the process happens with keyclock and with jenkins plugin.
Jenkins Plugin
Here the OIDCProvider is the jenkins plugin ( this plugin will need you to expose jenkins with a valid certificate, I'm doing that with cloudfront).

Keyclock

The setup will be as following,
dns records for keyclock and jenkins that points to cloudfront
ec2 machine with nginx, keyclock and jenkins
cloudfront that points to the ec2 machines
I'm using cloudfront certificated for the ssl termination, so for the keyclock I'm setting it to run behind a proxy.
Also I changed the authentication from jenkins to keyclock.
Note: for best practice I need to create a certificates ( using let's encrypt or any other way ) and run jenkins and keyclock with tls and provide the certificate, as I want to try mtls, and since cloudfront will terminate the ssl and won't pass the certificate it won't work.
I ran this setup on a single ec2 machine with normal docker compose, so it's not 100% production ready.
files
First I will document how did I setup the tools to work, as I mentioned I'm using docker and docker compose.
Dockerfile-keyclock
FROM quay.io/keycloak/keycloak:23.0.6 as builder

# Enable health and metrics support
ENV KC_HEALTH_ENABLED=true
ENV KC_METRICS_ENABLED=true

# Configure a database vendor
ENV KC_DB=postgres

WORKDIR /opt/keycloak
# for demonstration purposes only, please make sure to use proper certificates in production instead
RUN keytool -genkeypair -storepass password -storetype PKCS12 -keyalg RSA -keysize 2048 -dname "CN=server" -alias server -ext "SAN:c=DNS:localhost,IP:127.0.0.1" -keystore conf/server.keystore
RUN /opt/keycloak/bin/kc.sh build

FROM quay.io/keycloak/keycloak:23.0.6
COPY --from=builder /opt/keycloak/ /opt/keycloak/

# change these values to point to a running postgres instance
ENTRYPOINT ["/opt/keycloak/bin/kc.sh"]
Dockerfile
FROM jenkins/jenkins:2.436-jdk17

USER root

RUN ln -s /var/jenkins_home /var/lib/jenkins
RUN curl "https://awscli.amazonaws.com/awscli-exe-linux-x86_64.zip" -o "awscliv2.zip" && \
    unzip awscliv2.zip && \
    ./aws/install && \
    rm awscliv2.zip
RUN apt update && \
    apt install -y jq
docker-compose.yml
version: "3.4"
services:
  key-clock:
    build:
      context: .
      dockerfile: Dockerfile-keyclock
    ports:
      - "8080:8080"
    networks:
      - net
    environment:
       KEYCLOAK_ADMIN: admin
       KEYCLOAK_ADMIN_PASSWORD: admin
       KC_HEALTH_ENABLED: true
       KC_METRICS_ENABLED: true
       KC_DB: postgres
       KC_DB_URL: "jdbc:postgresql://db:5432/keyclock"
       KC_DB_USERNAME: keyclock
       KC_DB_PASSWORD: keyclock
       TZ: "Asia/Dubai"
       KC_HOSTNAME: "key-clock.2shta.com"
       KC_HOSTNAME_ADMIN_URL: https://key-clock.2shta.com
       KEYCLOAK_PRODUCTION: true
       KEYCLOAK_ENABLE_HTTPS: false
       KC_HOSTNAME_STRICT: true
       KC_HOSTNAME_STRICT_HTTPS: true
       KC_HTTP_ENABLED: true
       KC_PROXY: edge
    command:
      - start
    depends_on:
      db:
        condition: service_healthy

  db:
    image: postgres
    restart: always
    environment:
      POSTGRES_USER: keyclock
      POSTGRES_PASSWORD: keyclock
      POSTGRES_DB: keyclock
    volumes:
      - ./db_data:/var/lib/postgresql/data
    ports:
      - 5432:5432
    networks:
      - net
    healthcheck:
      test: ["CMD-SHELL", "pg_isready -U keyclock"]
      interval: 10s
      timeout: 5s
      retries: 5

  jenkins:
    container_name: jenkins-keyclock
    build:
      context: .
      dockerfile: Dockerfile
    ports:
      - "8000:8080"
      - "50000:50000"
    volumes:
      - $PWD/jenkins-home:/var/jenkins_home
    networks:
      - net
    environment:
      - TZ=Asia/Dubai

networks:
  net:

volumes:
  jenkins-docker-certs: {}
.env
JENKINS_HOME=/root/jenkins/jenkins_home
EXTRA_VOLUME=/root/jenkins/extra_volume
you can change the .env and any of the configuration.
then I added a nginx server infront of them and then a cloudfront distribution.
/etc/nginx/sites-available
server {
    listen 80;
    server_name jenkins.2shta.com;

    location / {
        proxy_set_header Host $host:$server_port;
        proxy_set_header X-Real-IP $remote_addr;
        proxy_set_header X-Forwarded-For $proxy_add_x_forwarded_for;
        proxy_pass http://localhost:8000;
        proxy_read_timeout 90;
        proxy_request_buffering off;
        #proxy_set_header X-Forwarded-Proto $cloudfront_proto;
        proxy_set_header X-Forwarded-Port 443;
        proxy_set_header X-Forwarded-Proto https;
    }
    #    access_log /var/log/nginx/jenkins_access.log custom_log;
}
server {
    listen 80;
    server_name key-clock.2shta.com;

    location / {
    proxy_pass http://localhost:8080;
    proxy_set_header Host $host;
    proxy_set_header X-Real-IP $remote_addr;
    proxy_set_header X-Forwarded-For $proxy_add_x_forwarded_for;
    proxy_set_header X-Forwarded-Proto $scheme;
    proxy_set_header X-Forwarded-Host $host;
    proxy_set_header X-Forwarded-Port $server_port;
    #proxy_set_header X-Forwarded-Proto $cloudfront_proto;
    proxy_set_header X-Forwarded-Port 443;
    proxy_set_header X-Forwarded-Proto https;
    }
}
now I can point the cloudfront to the ec2 machine and it will work fine.
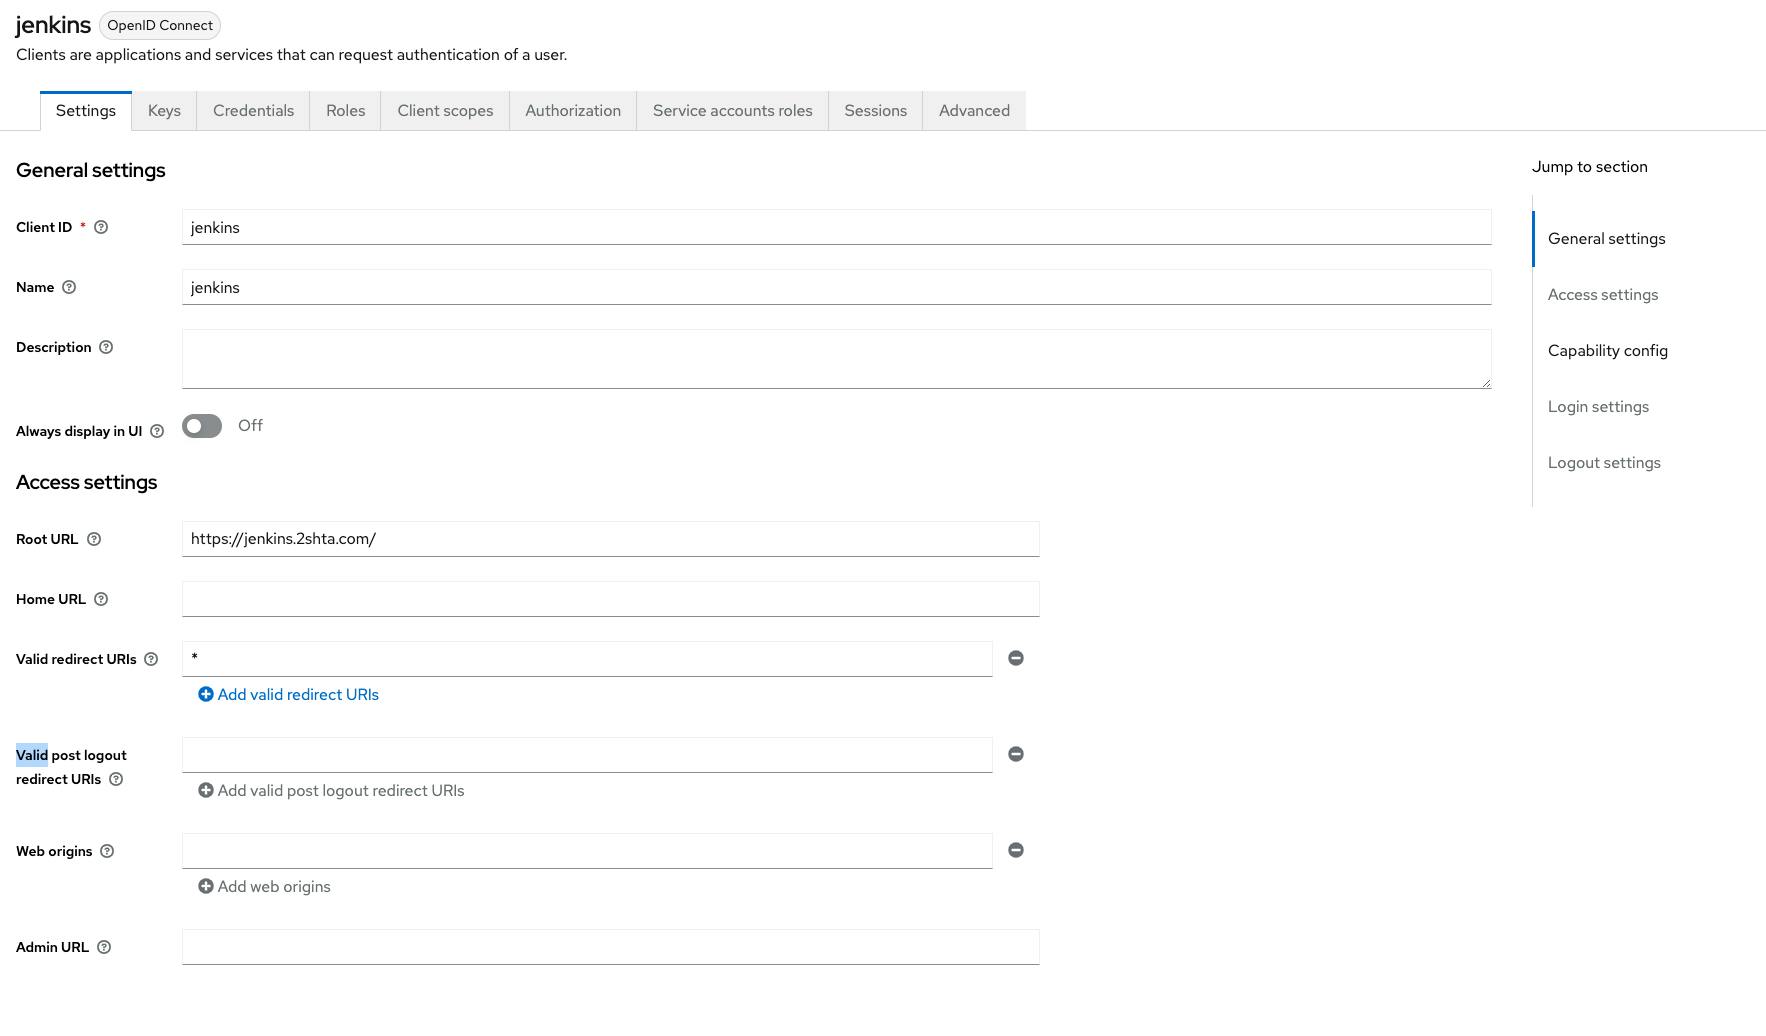
now in keyclock I created a new realm ci and I added 2 new clients in it.
the first client was to authenticate the users to jenkins.
Keyclock

then from the top right you will find a dropdown for the adaptor config the you can copy.
for jenkins to accept the tokens from keyclock we need to add the aud in the client.
to do this we first need to create a client scope and add a mapper for it.


and in the client scopes we need make sure that it's includes in the scope
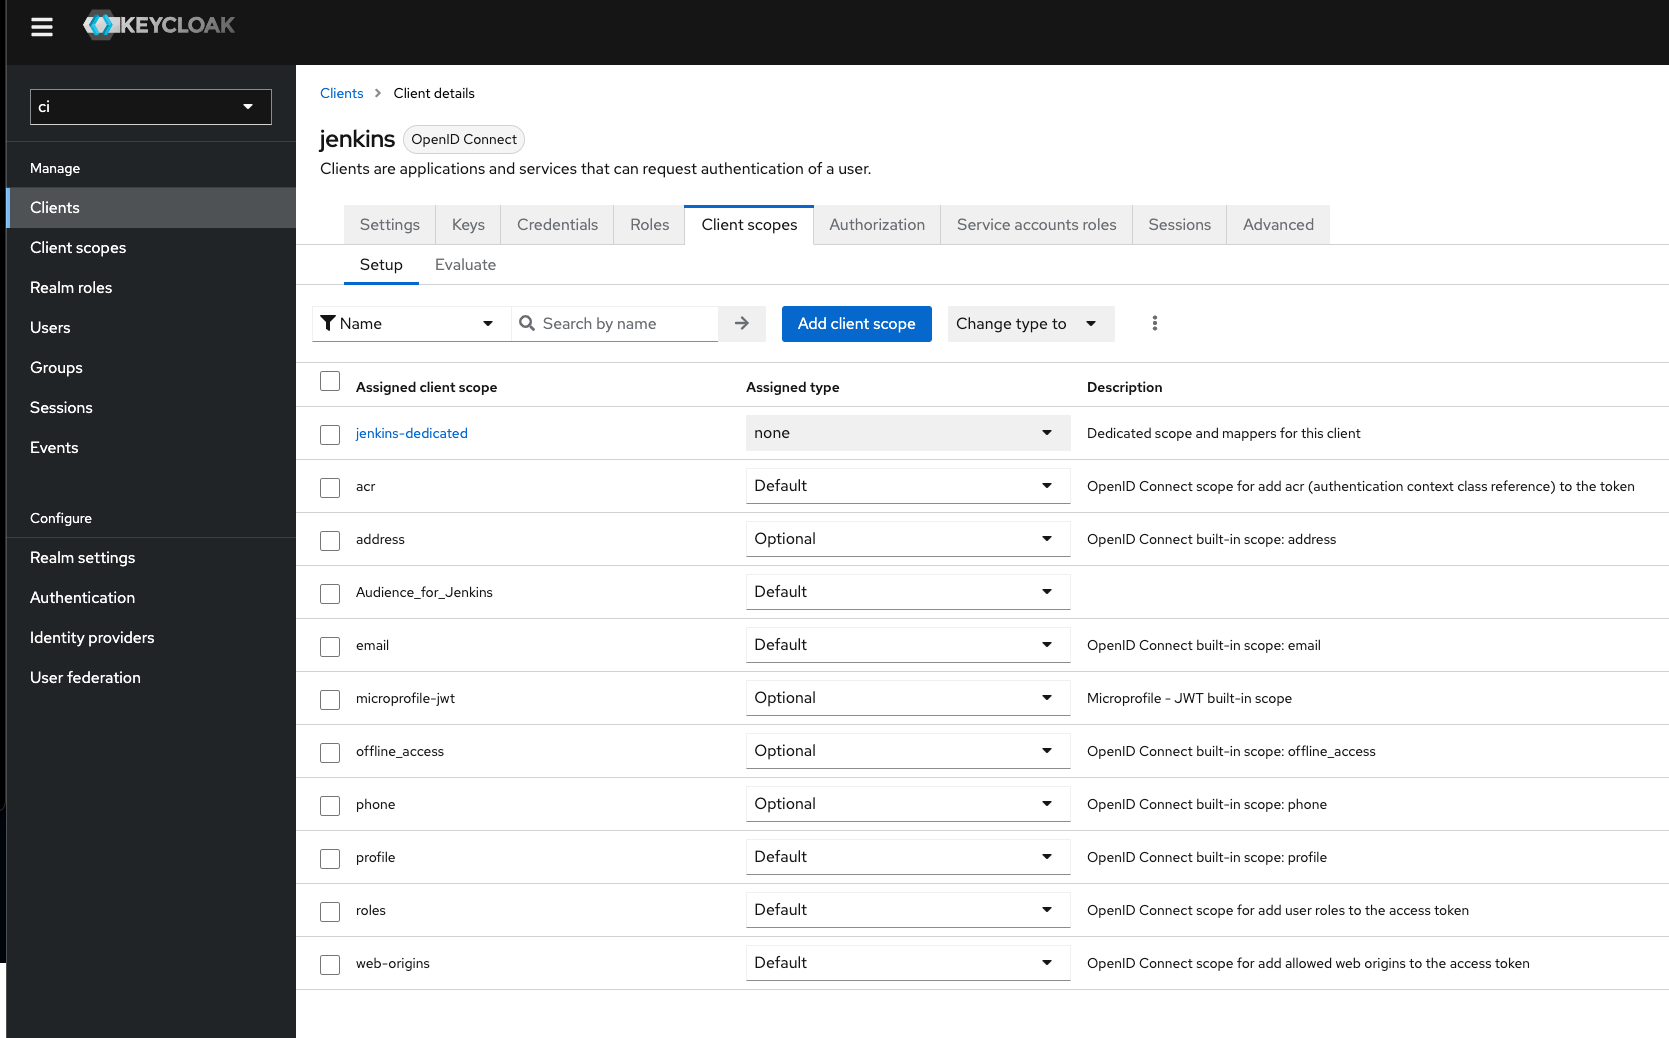
Jenkins
for jenkins we need to install 2 plugins, Keycloak Authentication Plugin and Role-based Authorization Strategy we will need both to make the users first authenticate with keyclock then get rerouted to jenkins.
once you install them you can navigate to mange jenkins and security.
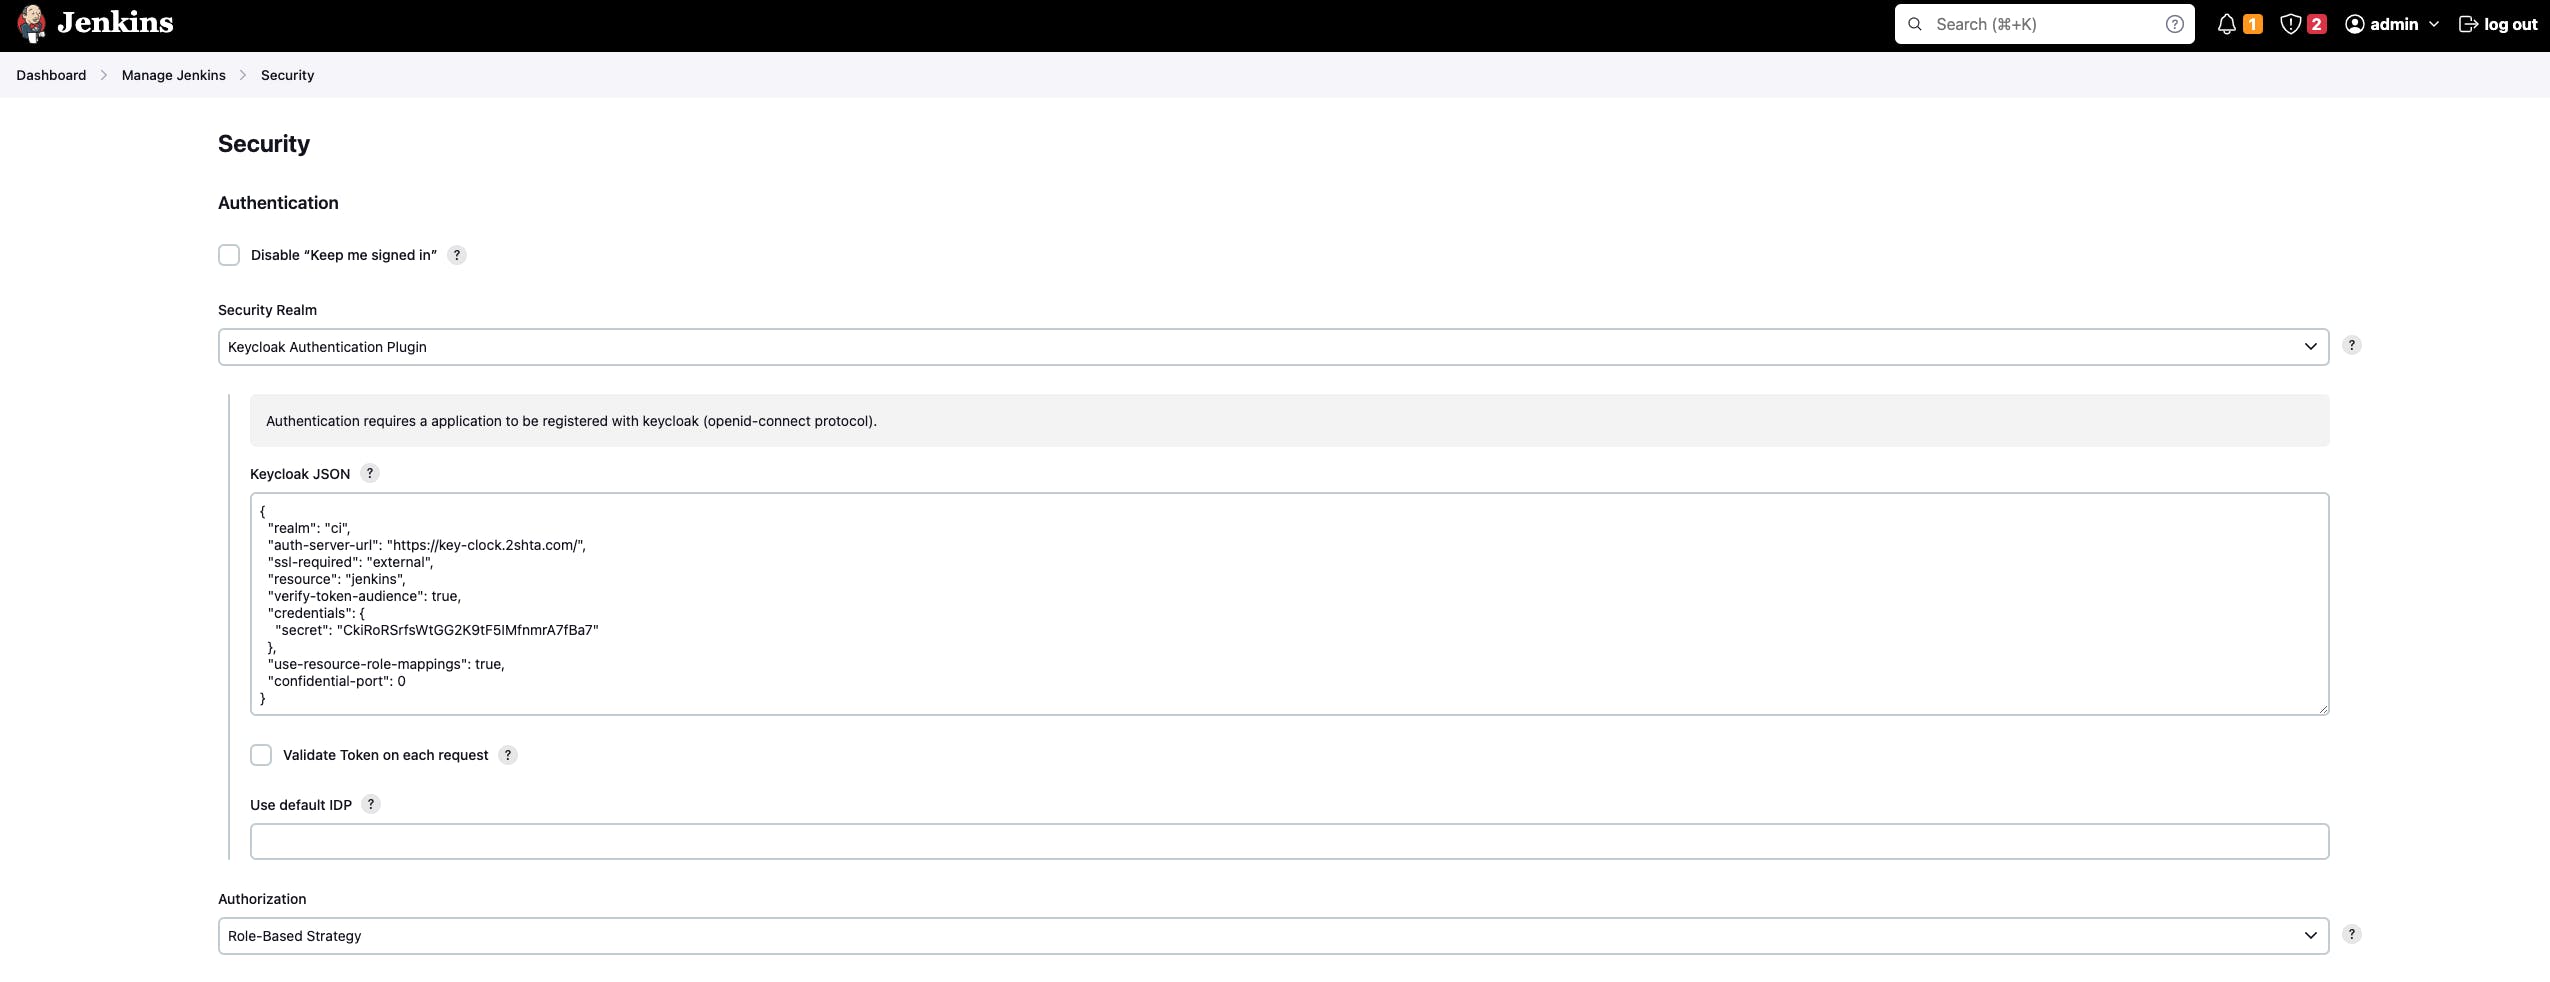
you will paste the configuration you copied from keyclock in the Keycloak JSON.
to also test the roles and groups, I configured 2 groups in keyclock admins and developers and in the jenkins settings.


and in keyclock this is the groups I added and I create a user and assigned it to the developers groups to test it.

now everything is configured right and if you opened a incognito page and navigate to the url for jenkins you will find it redirecting you to keyclock authentication.
Note: don't visit https://<your_jenkins_domain>.com/login?from=%2F for some reason I didn't know why, it won't redirect you. but if you visited https://<your_jenkins_domain>.com/ you will get redirected.
Authenticating with AWS
Now I want my jenkins jobs to be able to connect to my AWS account without long living keys.
you have 2 options, the first one is to use the plugin OpenID Connect Provider, now your jenkins will act as a openID Connect provider by it's own and will connect to aws.
and in aws you just need to do the following.
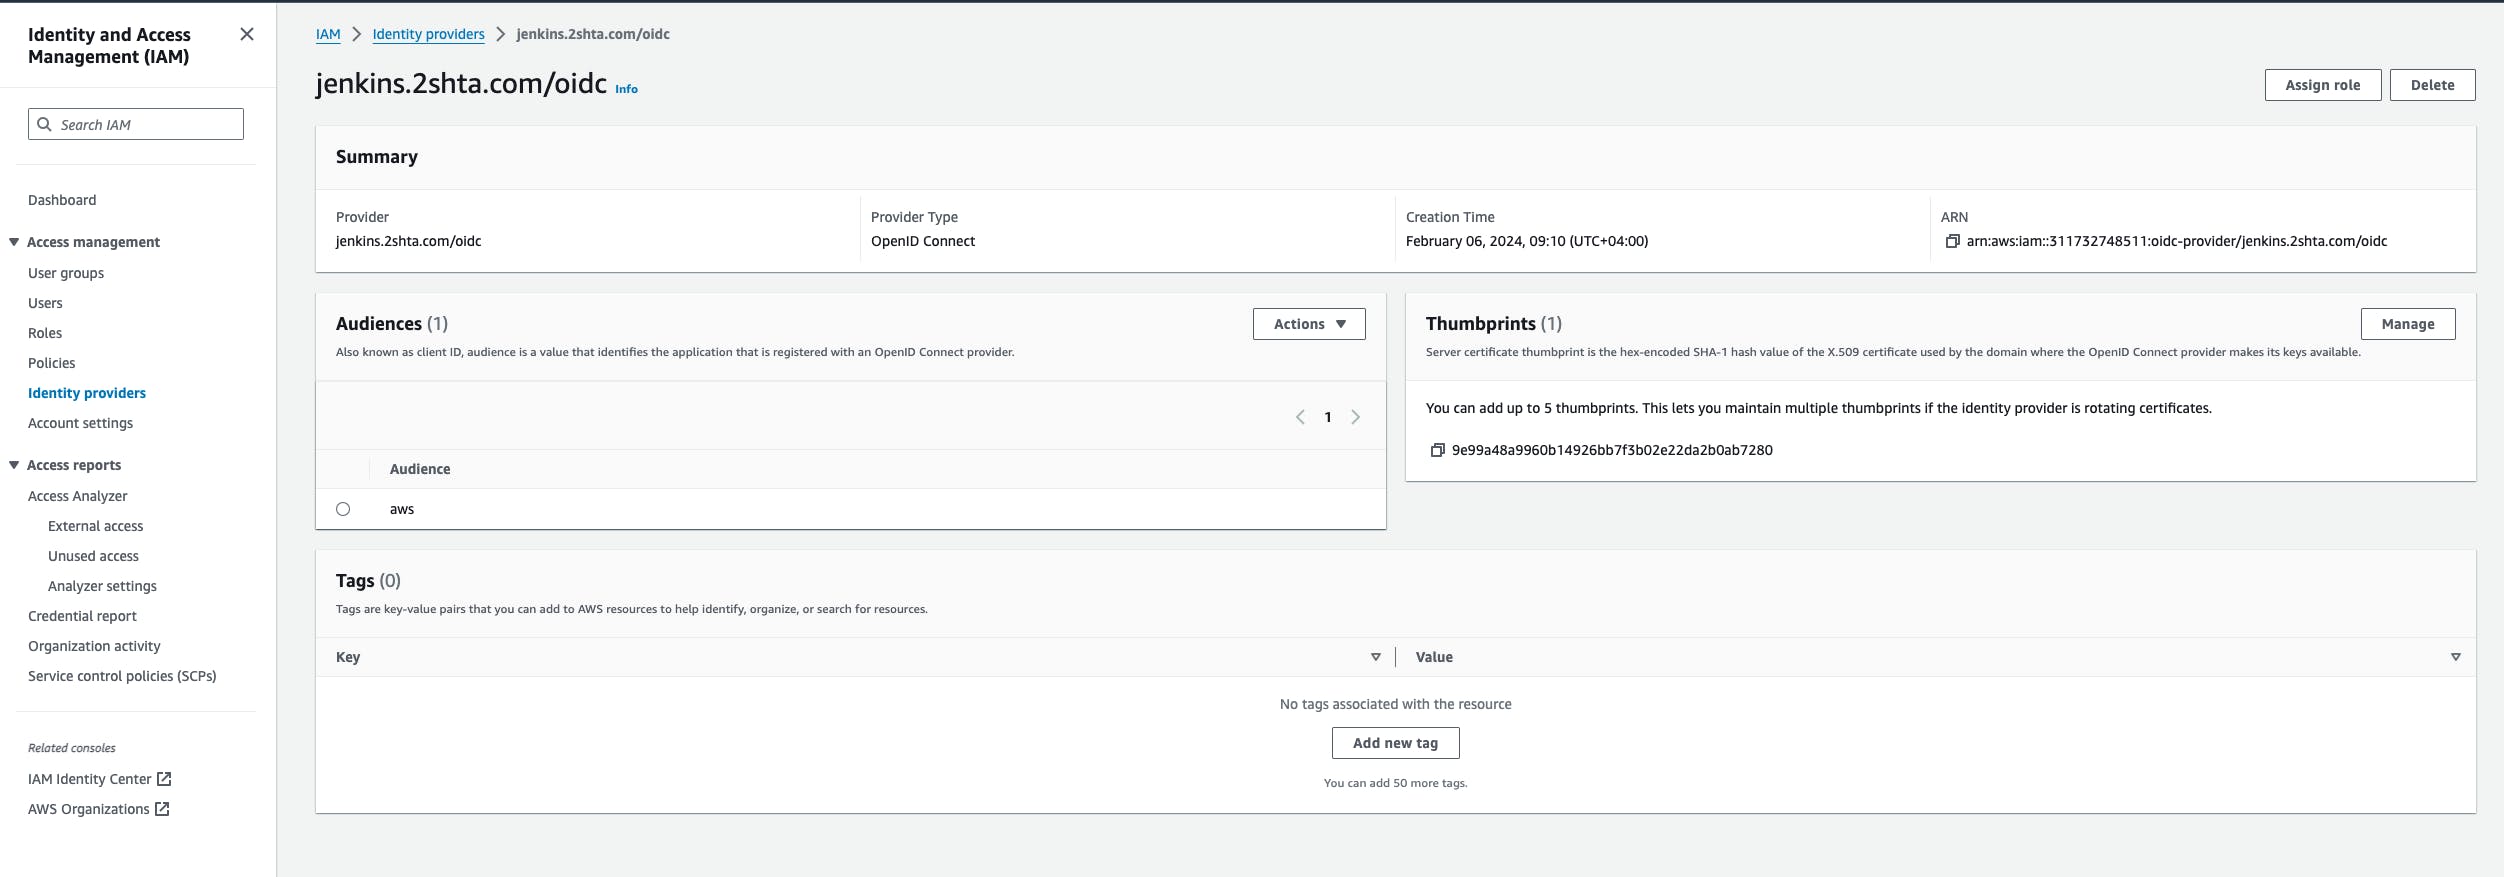
and create this iam role.


Now if you tried this job it will list all the s3 bucket ( you will need the plugin Pipeline Utility Steps for it to work)
pipeline {
    agent any
    environment {
        // Define environment variables; values will be set in the script
        CRED = ''
        AWS_ACCESS_KEY_ID = ''
        AWS_SECRET_ACCESS_KEY = ''
        AWS_SESSION_TOKEN = ''
    }
    stages {
        stage('Assume AWS Role') {
            steps {
                withCredentials([string(credentialsId: 'aws', variable: 'ID_TOKEN')]) {
                    script {
                        // Use a script to assume the role and set environment variables
                        def assumeRoleOutput = sh(script: '''
                        aws sts assume-role-with-web-identity --role-arn "arn:aws:iam::311732748511:role/jenkins-oidc-test" --role-session-name JenkinsSession --web-identity-token ${ID_TOKEN} --duration-seconds 900
                        ''', returnStdout: true).trim()

                        // Parse the output JSON to get credentials
                        def creds = readJSON text: assumeRoleOutput
                        CRED = creds.Credentials
                        // Set environment variables
                        print(creds.Credentials.AccessKeyId)
                        AWS_ACCESS_KEY_ID = creds.Credentials.AccessKeyId
                        print(AWS_ACCESS_KEY_ID)
                        print(creds.Credentials.SecretAccessKey)
                        AWS_SECRET_ACCESS_KEY = creds.Credentials.SecretAccessKey
                        print(AWS_SECRET_ACCESS_KEY)
                        AWS_SESSION_TOKEN = creds.Credentials.SessionToken
                    }
                }
            }
        }
        stage('Print AWS Access Key ID') {
            steps {
                echo "AWS_ACCESS_KEY_ID: ${env.AWS_ACCESS_KEY_ID}"
            }
        }

        stage('Use AWS Credentials') {
            steps {
                script {
                    // Pass environment variables as arguments to the bash script
                    withEnv([
                    "AWS_ACCESS_KEY_ID=${AWS_ACCESS_KEY_ID}",
                    "AWS_SECRET_ACCESS_KEY=${AWS_SECRET_ACCESS_KEY}",
                    "AWS_SESSION_TOKEN=${AWS_SESSION_TOKEN}"
                ]) {
                        sh '''
                    # Now you can use AWS CLI commands that require authentication
                    aws s3 ls
                    '''
                }
                }
            }
        }
    }
}
Different solution
anther solution for jenkins to connect to AWS is to get the token from keyclock and use it to connect to AWS.
Here keyclock will be the openid provider.
so all you need to do is to create a new client in keyclock

and also create a new client scope and assign the audience you need, in my case I create a new one with the audience "jenkins-apps" and create a AWS identity provider.
the idea here is I wanted different jobs to have different permissions in aws so by using the claims I can control this in aws so for folder of jobs I can create a client with a different claim to controll this ( first I was thinking of a way to custom set the claim from jenkins curl but I couldn't find a way to do this )

Here I have 2 audiences as every time I create a new client for different scope I need to add the audience I gave it in aws for aws to accept.
curl your keyclock to get the token and then use it to authenticate to AWS.
pipeline {
    agent any
        environment {
        // Define environment variables; values will be set in the script
        CRED = ''
        AWS_ACCESS_KEY_ID = ''
        AWS_SECRET_ACCESS_KEY = ''
        AWS_SESSION_TOKEN = ''
        TOKEN= ''
    }
    stages {
        stage('Get OIDC Token') {
            steps {
                script {
                    // Define Keycloak token endpoint and client credentials
                    def tokenEndpoint = 'https://key-clock.2shta.com/realms/ci/protocol/openid-connect/token'
                    def clientId = 'jenkins-apps'
                    def clientSecret = 'z0QGxIBpuTGshT7MzAV'
                    def scope = 'openid'

                    // Prepare the request payload
                    def postData = "grant_type=client_credentials&client_id=${clientId}&client_secret=${clientSecret}&scope=${scope}"

                    // Send the request to Keycloak
                    def response = sh(script: "curl -s -X POST '${tokenEndpoint}' -d '${postData}' -H 'Content-Type: application/x-www-form-urlencoded'", returnStdout: true).trim()

                    // Parse the JSON response to get the token
                    def parser = new groovy.json.JsonSlurper()
                    def jsonResponse = parser.parseText(response)
                    TOKEN = jsonResponse.access_token

                }
            }
        }
        stage('Assume AWS Role') {
            steps {
                script {
                    // Assume the AWS role using the OIDC token
                    def assumeRoleOutput = sh(script: """
                        aws sts assume-role-with-web-identity --role-arn "arn:aws:iam::311732748511:role/jenkins-oidc-test" --role-session-name JenkinsSession --web-identity-token '${TOKEN}' --duration-seconds 900
                    """, returnStdout: true).trim()

                    // Parse the output JSON to get credentials
                    def parser = new groovy.json.JsonSlurper()
                    def creds = parser.parseText(assumeRoleOutput)

                    // Set environment variables with the temporary credentials
                    AWS_ACCESS_KEY_ID = creds.Credentials.AccessKeyId
                    AWS_SECRET_ACCESS_KEY = creds.Credentials.SecretAccessKey
                    AWS_SESSION_TOKEN = creds.Credentials.SessionToken
                }
            }
        }
                stage('Use AWS Credentials') {
            steps {
                script {
                    // Pass environment variables as arguments to the bash script
                    withEnv([
                    "AWS_ACCESS_KEY_ID=${AWS_ACCESS_KEY_ID}",
                    "AWS_SECRET_ACCESS_KEY=${AWS_SECRET_ACCESS_KEY}",
                    "AWS_SESSION_TOKEN=${AWS_SESSION_TOKEN}"
                ]) {
                        sh '''
                    # Now you can use AWS CLI commands that require authentication
                    aws s3 ls
                    '''
                }
                }
            }
        }
    }
}
now you can authenticate to AWS without using long lived keys.
a more secure way is to use mtls but as I don't have direct certificated to use in jenkins and keyclock I can't do this now.